Saturday, September 12, 2015

Prepare 4 crock pot freezer meals in a hour and a half and feed a family of 6!


  It's that time again, kids are in school and we are trying to figure out a good hearty meal for them that does not require to much time and effort. We have homework, chores and sports. Where are we finding time to get a good meal? I found myself buying A-LOT of junk to feed them and going out to eat. I have always seen people posting about these "Super easy freezer meals, under __ hours. I had a real hard time believing that. My household size is not a normal size. I don't know a whole bunch of people with 4 kids.. So I was a skeptic for sure! I figured that it would take longer to double everything. Here I am telling you it IS that easy! 


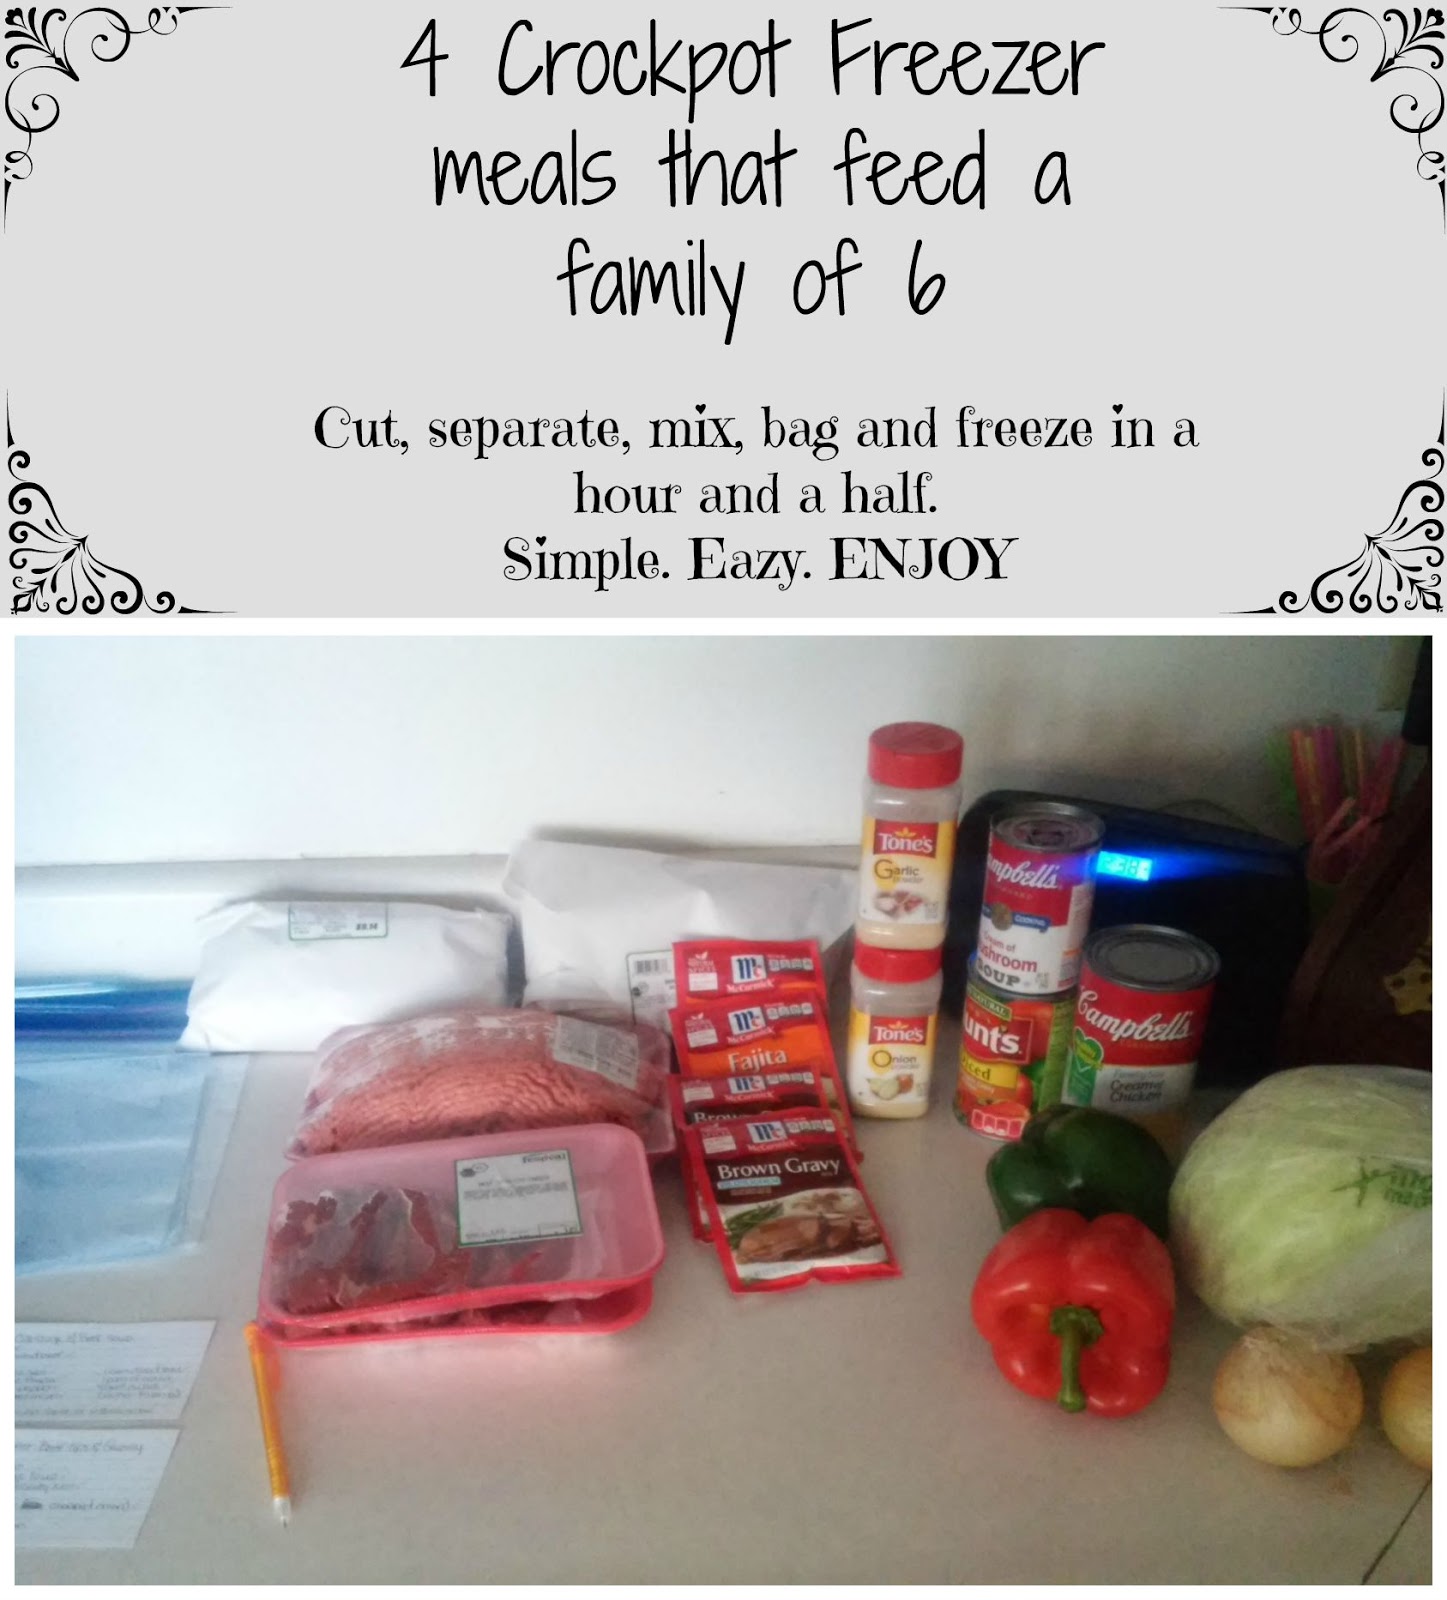
  While thinking of meals and digging around on Pinterest I had to remember that all these meals have to be "Mike Approved" Seriously.. he is PICKY! Worse than a toddler, no joke. His list of likes is way shorter than this likes. Cooking for him can be difficult at times. I came up with 4 crockpot meals that where completely mixed in the bags (No extra dishes to wash, WINNING!!). I tried to get out as much air as I could when each meal was finished. I would suggest that you fold down the sides of your bags and hold on tight so you don't spill. You can use a dish to sir the wet stuff but me.. well call me lazy or what ever the more dishes that don't pile up in my sink or on my counter is a blessing!


  I waited until now to post this (friends and family that are on facebook, this is for you!). I have had numerous people asking for recipes and finding what I am doing a great Idea. This (soon to be) past week Sep. 7th to Sep. 10th (Mon-Thur) my family has had crockpot meals all of them came right from the freezer to the crockpot. That simple.


Simply empty the contents in the crockpot! You may have to tear one side completely open, I did with all of them. Easy clean up and we had left overs all week except for Beef Tips and Gravy night, I didn't even think about taking pics before I handed out bowls but everyone was excited to eat. The kids would all come home saying how good the house smelled. I take pride in that, they are my biggest fans :)


This is my amazing family!


 I have enjoyed cooking these meals.This opened up time for me to get a few things done around the house and work on some new patterns that I will be releasing soon. I feel like I have accomplished quite about with getting my blog planner organized, a few patterns written and tested and enjoyed every minute! I can't believe that tomorrow is Sunday, That is why this one is being finished right now :)


A basic beanie pattern I worked up (Soon to be released) 
I'm working on a order and this is what I came up with!
I love these colors together <3
I will be adding a ton more!
Any questions, email or message me I'd be happy to help


  I hope you guys believe me when I say it is SO worth it! Taking a day (mine was Saturday) and sit in the kitchen for a short while to prepare your meals so your house can still have a healthy, cheap and easy meal.

  I did it again for this weeks meals. I'm so excited! My facebook friends know that I went out on a limb and bought a Foodsaver system and I found out NO do not mix the wet stuff in with the bag. It could get a bit messy. Other than that I am LOVING it!! Mike even helped in the kitchen today, helping with bagging and cutting up the meat. Honestly I think some of it has to do with him getting to play with it.. I was so happy to have him there with me.

  Are you ready to make your grocery list?

Lets start

1. Sit down either by yourself or with your significant other. I made a list of a few things I seen on pintrest that looked good but I had ideas on how to make it "Mike approved".

2. Write down all ingredients that you will need, don't forget freezer bags!
**You will need 4 gallon size freezer zip lock baggies**

3. Come home and start separating your items. I like to organize mine, meats, seasonings, veggies, recipes, etc. 

Scroll down for beef tips and gravy


**Dinners**


Beef tips and gravy

 -3 LBS of stew meat (helpful hint: buying the long already cut up strips are cheaper than buying all the meat cut up. It took me all of 2 minutes to cut chunks up and remember they fall apart in the crockpot)
-2 cans cream of mushroom soup (he didn't even know that was in there. He is NOT a mushroom guy)
-4 pkg of powder gravy mix
-1 cup water
-half of a large onion chopped up (I used onion powder mike does NOT like onions either lol)
-Rice, pasta or mashed potatoes you choose!
Mix the cream of mushroom soup, brown gravy mix & water
right in the bag. I folded down the sides and held on to make sure I 
didn't spill it (the less dishes the better right?)

add the gravy, cream of mushroom soup water to the bag, mix together and add the rest. Get out as much air as you can and seal it.

Cook on low 7-8 hours serve over pasta, rice or mashed potatoes (all of them are YUMMY)

---------------------------------------------------------------

Monday, September 7, 2015

Crochet Twisty Top Boot Cuff Pattern.. 5 sizes!


 How about a boot cuff pattern that don't slip when you wear it and also a boot cuff pattern you can make as a mommy & daughter set? Yeah your in the right spot! I love designing things that not only look cute but also very functional. Being a mom to 4 I am always going and pulling up boot cuffs every 5 minutes is enough to drive me nuts. So I made these to go along with my Twisty Top beanie I designed and published a week or so ago. Whats awesome about these boot cuffs is that you have 5 sizes to choose from! Yes I said that and you read that right, 5 sizes toddler to adult large. Not all woman are alike and have the same body type. Im on the medium size and not all boot cuffs I have made fit right. I like the idea that you can wear jeans or leggings it don't matter they still look cute! Dress them up with pretty ribbon or dress them down and leave it off, let the spiral show its curves. They work great for mommy & me matching accessories, either for your self or a family member or a friend. They stay in place with out the slouching down and with the ribbon you can even tighten it up if need be. Each size was tested and tried on, Fits great!!


*my amazing (almost 11 year old) step son took the pics! Yes that is me and he did a AWESOME job! Even tho I told him only take pics of the waist down to show the boot cuffs he snapped this one. He loves the camera and playing with it*

 I'm so excited to release this new pattern! I am not going to lie, last week we had a cool 70 degree day so of course I got out my boots and slipped these on! During the chilly months you will find me with leggings more than anything else and I always have boots on. I LOVE being comfy and being cute. While out and about I got complements about how cute they where with the ribbon and I did such a great job. I appreciate when I get complemented, it makes me feel that I have done something right.
  Like all my paid patterns I work hard to make sure they are easy to read, lots of notes that are useful for the patterns. With out my testers I turn too (new and one's Ive counted on numerous times) my patterns wouldn't be this good. I take a lot of pride in my patterns and I make sure that they are as close to perfect before I list them. Sometimes that may be 2-4 times before getting it right but well worth it when I see finished items. It always makes me feel great to see others use my patterns and share patterns with me!
  I'm sitting here at my computer getting geared up for this week, I am writing in my blog planner trying to get organized. I will be sharing some easy, quick and saving money tips for in the kitchen this week. I am over joyed with what I have put together! So much is going on this week and to think it is only Monday!
  I hope you all enjoy this pattern as much as I do!


CLICK ON RAV, CRAFTSY OR ETSY TO PURCHASE THE PATTERN!
Buy on Ravelry
Buy on Craftsy
Buy on Etsy

Don't forget to share this post!
~Heather

Tuesday, September 1, 2015

School's in session! Try this granola bar recipe super simple 4 ingredients!!

Homemade granola bars!
  I am sure just about everyone has sent there kids off to school by now. Today was my kids first day of school and they where EXCITED! Quite honestly I was excited about the piece and quite, the non-stop yelling and tattling ALL.THE.TIME. Yes, I am not ashamed to admit it! 4 kids, confide in a small space and not much outside area is not a good combo. We have went here and there, did some fun things but Ashlynn spent weeks sick. Her counts where down so much that she barely left the house to reduce the risk of infection or another virus.. So school is a blessing right now. I am also trying to get up on house work today and got a little accomplished! Something that hasn't happened in a while because I have 4 tornado's that are constantly rolling through my house.

  I have been stuck to pintrest trying to come up with different snack idea. I give them a snack when they come home from school and I guess we have to send "good, healthy snacks" to school for snack time. Like I said.. 4 kids! Im a stay at home mom and I need to find ways to spend less on snack items and I want them to be healthy ones! What's healthier than home made snacks, not just something with junk in it but something that is GOOD?


I used a cake pan
   ONLY 4 INGREDIENTS, quick cooking oats, butter, sweetened condensed milk and M&M's! Its $8.10 for all 4 things on the list if you don't have any ingredients. If you do, even cheaper! I just did the math, figured out how much I spent ONLY on what I used (not the extra oatmeal, stick of butter and the M&M's I didn't use) I spent $2.78 to make 15 bars; thats $0.19 EACH!! I'm saving money and my kids are eating good.
Finished! Cut and cooling
Bagged and in the snack bucket! Ready for snack at school or lunch.

 Much trial and errors happen in my kitchen and these.. done so quick! 

Saturday, August 22, 2015

Baby Twisty top beanie pattern (paid)


It's been one heck of a week.. but it is finally done! I love the twisty top beanie so much I wanted to make another one but for the little's in our life.

I started this pattern just after I released the adult hat, I have been sitting on this pattern for a little over a week now. Not that I wanted to but that was the last thing on my mind. As some may know my daughter (my blog post on her illness click here) has been sick since 2014 she was diagnosed with Leukemia and this past week she has been trying to fight off a virus! It had us in the ER 2 times with in 3 days. So I have been trying to tend to her and her brothers that came back from there mom's a week ago. Life in the Williams/Grundy house hold has been a very eventful one at that. Long story short her immune system has been non-existent for 3 weeks now, her counts have been so low that she can't take her chemo (which is everyday orally at home and once a month in clinic). This is her body's way of saying chemo has been to much lately and she needs a break. 
Honestly it breaks my heart, I can't really help. We have done all that we as her parents can do and the rest is up to her little body.  

Today is the day! I am finally able to release it :) I am pretty excited and hope you are too. Holly from Hooked by Holly was kind enough to let me use her cute little boys picture!


**REMEMBER! ALL MY PATTERNS IN MY RAVELRY STORE IS 50% OFF TILL AUGUST 31ST TILL 11:59PM CST**


Buy in my Ravelry store


Thursday, August 20, 2015

Ring around the cup Cozy

It's almost that time of year again.. fall, football season, all fall sports for children and what's going to the practice or game with out your drink? I know I use mine throughout the day and have many different styles of them, some for coffee and some for my iced beverage's! I absolutely love them.

I was sitting out side this morning with my coffee trying to absorb the little bit of sun and the crisp cool air. Today was our second day of 70 degrees and honestly I am not complaining at all! I love the cool air after being in the upper 80's for what seemed to be weeks. I have been having these templates sitting around and really wanted to put them to use (Check below for the link to the cup cozy template). So the first thought was the packers I'm not a fan of football but everyone here in Wisconsin is a die hard packer fan.. seriously.. Im talking Sundays there dressed head to toe in packer gear, when the game starts the stores are empty just about. I LOVE Sunday shopping lol! I thought I would make some cool looking cozys to take to the game for bought beverages or simply sitting at home showing there support to there favorite team. Plus I am in love with the spiral affect of the cozys. It gives it a little edge it also stretches a little to hug cup ;)

The color options are endless, match them to your favorite boots or purse, color coordinate them to your favorite sports team, your children's teams, or you can go funky and use a ton of different colors!

Free cup cozy template by Sheri Goad at Frogging along


You may sell any finish item, if you sell online please give me credit for the design. You may not under any circumstances sell this pattern, or claim this pattern as your own. This is a one of a kind Creative Crochet Products Design. 
Feel free to share this link to my blog & happy Crocheting!
Ring around the cup
Cozy


 By Creative Crochet Products
Materials:
G/4.50mm Hook
Worsted weight yarn (red heart, I love this yarn, etc)
Yarn needle
Stitches used:
hdc: half double crochet
sp: space
Special notes:
You will always join to your first stitch made in each round. Please follow the pictures if you don't understand the written directions, they are their to help you
.

Saturday, August 8, 2015

50% off all my patterns in my Ravelry shop!

My fathers Birthday is today (August 8th) and my brothers birthday is August 23rd he would have been 30 this year! My father has been one of my supporters with my crocheting, I am sure if my brother was here he would be too. So I thought this would be a good way to celebrate my 50% off sale. 
NO COUPON NEEDED!
Now through AUGUST 31 11:59pm (CST)
 
 I am still working on getting more patterns listed, I'm still a newbie at this :) but I assure you ALL my paid patterns are tested by multiple people and all sizes that are listed have been tested! I work really hard to keep my paid patterns easy to read so a beginner could even do them!
 
Every year around my brothers birthday I always talk and reminisce about the good times, the bad times, and what we went through when his passing happened. That will be a whole different blog post! Its quite sappy and this is a celebration :)

Friday, July 31, 2015

Twisty Top Beanie!

I am so excited right now! I am in love with this new pattern that I have finished and I am not going to lie, I usually come in contact with some pretty amazing testers (some that I have used more than once). I have been working on getting this pattern up online for the last few days, and that day has came! I have been working hard on perfecting this hat and have had 5 testers on the 3 sizes that are available (child 3-5; preteen; adult med). I have to say that it is a lot harder than you could imagine to write patterns. There is a lot of time in to making them, perfecting them, testing, pictures, details.. It's a lot! I give credit to designers that do this multiple times a month. 
I would like to thank my testers from the Hodge ;) 
(below is the coupon code but be sure to check out the pics!) 
 
 
 A special shout out to Vannessa from Mini Loopy Love 
She has tested mulitiple patterns for me and allowed me to share this picture 
she took of her BEAUTIFUL daughter modeling the Twisty Top Beanie! 
The funny thing is we asked our hubbys what pic we should use (we couldn't
decide because they where all too cute) and they both choose.. This one!! 


 Buy the Twisty Top HERE with coupon code below:


Head over to my Ravelry shop:  Creative Crochet Products
add any pattern to chart and use coupon code: THANKYOU
check out.
 
HAPPY CROCHETING!


Thursday, July 30, 2015

Crochet Instagram! Free Pattern


    I have been sitting on this pattern for a little while. It was suppose to be typed up a while ago but sat in a folder being neglected. poor thing! There is a flaw on the picture (if you haven't noticed it already!) my rainbow stripes where on there the wrong way. Make sure you check before you start attaching it on to your cozy! I didn't realize it till it was too late, so I thought I would worn you about it. Plus I stayed up late doing this one and writing a hard copy and again tonight I have stayed up till 1 am getting it typed up and saved and ready to be published. 
    Find me on facebook or instagram to share your finished item, I love seeing others work from my patterns :) 

    HAPPY CROCHETING!

Instagram iPad cover


Materials:
* G/4.5mm hook
* E/3.50mm hook
* 7 colors of worsted weight yarn
  ivory; brown; black; yellow; blue; green; red

Stitches used:
*  hdc: half double crochet
*  hdc2tog: half double crochet 2 together
*  sc: single crochet
*  sc2tog: single crochet 2 together
* magic circle
*BLO: back loop only


Special notes (MUST READ):

*  You will ALWAYS JOIN to your first st (stitch) made in each round!
*  You will ALWAYS start your first stitch in SAME space as your join!

I will NOT remind you throughout the pattern. it is stated here so I don’t have to repeat it. If you are not able to follow the special notes I don’t think this pattern is right for you.
~~~~~~~~~~~~~~~~~~~~~~~~

I love seeing finished items! please feel free to share with me on social media! Don’t forget to like my page for future giveaways

If you have any questions or concerns please email me at creativecrochetproducts@gmail.com 

Thursday, April 30, 2015

ring around the rug

  I have been wanting to crochet up a rug for a little while now. I thought today I would "attempt" to make a rug, I grabbed a few balls that I thought I would never use (Im not a big fan of scratchy yarn) and I picked up a few bigger crochet hooks (P&Q is what the pattern calls for!). I sat down with my hooks and yarn for about 2 hours and had it finished.
  I made it just big enough for your bathroom or your kitchen sink. With working 4 strands of yarn together can you imagine how soft this would feel under your feet? My piggys liked them :)

(my nail polish color is Randi it girl by Julep, Im totally in love with there colors and all the different colors they have to choose from) Since my daughter was sick we have gotten a monthly box from them, Its our own little way of keeping happy every month. Its something special for her and I, something that we can do together. So far we have gotten quite a lot so far. 

I hope you all enjoy this pattern.

Ring around the rug
By: Creative Crochet Products
Materials:
I used 4 colors of red heart yarn
you can use any color combo that suits you!
HOOKS; P(11.5mm) & Q(15.75)
Stitches Used:
Ch: chain
Sc: single crochet
Hdc: half double crochet
Dc: double crochet
Sk: skip
Special Notes:
1.Always join to first stitch made.
2.always work your first stitch in joining space, unless specified otherwise.
A little tip from me to you: I usually try to find my yarn with a tail (an end coming out the center of the ball) it keeps things neater but you could always toss all the balls you're working with in a thirty-two tote or a basket. Don't pull a big pile of yarn out, it could get tangled easy.
Measurements:
27”x16”

P hook:
Rnd 1. ch 17, 2 hdc in 2nd ch from hook, hdc in next 14, 5 hdc in last ch sp (now working on the un-worked side of the ch (working left)), hdc in next 14, 3 hdc in same sp as the first 2 hdc. Join. (38)
Rnd 2.  ch 1, 2 hdc same sp as join, 2 hdc in next, hdc in next 14, 2 hdc in next 5 sp, hdc in next 14 sp, 2 hdc in last 3. Join (48)
Rnd 3. ch 1, hdc in same sp, *2 hdc in next, hdc in next* repeat 1 more time, hdc in 14, *2 hdc in next, hdc in next* repeat 4 more times, hdc in 14, *2 hdc in next, hdc in next* repeat one more time, 2 hdc in last sp. Join (58)
Rnd 4. ch 1, hdc in same sp, hdc in next, *2 hdc in next, hdc in next 2* 1 more time, hdc in 14, *2 hdc in next, hdc in next 2* repeat 4 more times, hdc in 14, *2 hdc in next, hdc in next 2* repeat 1 more time, 2 hdc in last sp. Join (68)
Rnd 5. ch 3 (this is your first dc), dc in next 2, *2dc in next, dc in next 3* repeat 1 more time, dc in next 14, *2 dc in next, dc in next 3* repeat 4 more times, dc in 14, *2 dc in next, dc in next 3* repeat 1 more time, 2 dc in last sp. Join (78)
Rnd 6.  ch 3 (this is your first dc), dc in next 3, *2 dc in next, dc in next 4* repeat 1 more time, dc in next 14, *2 dc in next, dc in next 4* repeat 4 times, dc in 14, *2 dc in next, dc in next 4* repeat 1 more time, 2 dc in last sp. Join  (88)
  
  At this point your rug might be kind of bunching up and after the last few
                                 rows it will “relax” more.

Rnd 7. ch 1, sc in each sp around. Join (88)
Rnd 8.  ch 4 (this is your dc and ch 1), *sk next, Dc in next, ch 2* repeat 3 more times, *sk next, dc in next, ch 1* repeat 10 times, *sk next, Dc in next, ch 2* repeat 10 times, *sk next, dc in next, ch 1* repeat 10 times, *sk next, Dc in next, ch 2* repeat 5 more times. Join to the 3rd ch of beg dc.
Rnd 9.  ch 1, 2 sc in same sp as join, 1 sc in next ch 1 sp, *sc in next dc, 2 sc in ch 2 sp* repeat 4 more times, 2 sc in ch 1 sp and 2 sc in next 9 ch 1 sp, *sc in next dc, 2 sc in ch 2 sp* repeat 10 more times, 2 sc in ch 1 sp and 2 sc in next 8 ch 1 sp, *sc in next dc, 2 sc in ch 2 sp* repeat 5 more times. Join
Rnd 10.  ch 1, sc in each sp around. Join
Switch to Q hook
Rnd 11.  ch 1, cs around entire project. Join and fasten in ends!


Sunday, March 8, 2015

The amazing "MikeMitts"!

To explain a little about these MikeMitts, These where made for a special man in my life who has been put through a lot these last few months and with many more hurdles ahead of him. He was in a serious snowmobile accident and was stranded outside in sub-zero temperatures and ended up getting frostbite on his hands and feet. This week he underwent his first amputation to his hands. So I thought I would do something nice for him and after talking to my cousin for a little while she told me about how he would like something for his hands, they get cold at night and he would love to get a pair of mitts. So I thought I would put my imagination to work. I came up with these adult size mitts for amputees, 
This man is a inspiration to me, to his wife, daughter, family and friends. Even after all that has happened he still has his sense of humor, still cracking jokes and is caring a smile with him. Life is going to be tough for him, my aunt and cousin for a while. They will find a way to push forward as we always have. They have so much love and support from everyone one and I am happy to help in any way I can. If you are looking to help, the family has set up a donation page in his honor Give Forward (Mike Rich) 
 These MikeMitts are extra special to me considering he named the pattern (yes you heard me right, he named the pattern). I gave him the option to name it if he would like to name it or not and he did! Oh how I cant wait to see my family, hug them and remind them how much I love them.. 


Materials:
*worsted weight yarn (I used Red Heart with love and I love this yarn at hobby lobby)
*H/5.00mm & I/5.50mm hook
*Yarn needle to tie in ends when finished

Stitches:
Magic Circle
Hdc: Half Double Crochet
Fphdc: Front post half double crochet
Bphdc: back post half double crochet
Fpsc: Front post single crochet
Bpsc: Back post single crochet

Special notes:
** Always join to first st in each round, and ALWAYS work your first st in the same sp as join in each round unless stated otherwise.** Your front post with be worked in a front post. back post in back post. etc..

WITH I HOOK
Rnd 1: Magic Circle, ch 1, 11 hdc in circle, pull tight to close. Join (12)

Rnd 2: ch 1, 2 hdc in each st around. Join. (24)

Rnd 3: ch 1, hdc in each sp around. Join. (24)

Rnd 4: ch 1, *hdc in next 3, 2 hdc in next* repeat around. Join. (30)

Rnd 5: ch 1, hdc in each space across. Join. (30)

Rnd 6: ch 1, hdc in each space across. Join. (30)

Rnd 7: ch 1, hdc in each space across. Join. (30)

Rnd 8: ch 1, hdc in each space across. Join. (30)

Rnd 9: ch 1, hdc in each space across. Join. (30)

Rnd 10: ch 1, hdc in each space across. Join. (30)

Rnd 11: ch 1, hdc in each space across. Join. (30)

WITH H HOOK
Rnd 12: ch 1, fphdc in first, bphdc in next, *Fphdc in next, bphdc in next* repeat around. Join. (30)

Rnd 13: ch 1, fphdc in first, bphdc in next, *Fphdc in next, bphdc in next* repeat around. Join. (30)

Rnd 14: ch 1, fphdc in first, bphdc in next, *Fphdc in next, bphdc in next* repeat around. Join. (30)

Rnd 15: ch 1, fphdc in first, bphdc in next, *Fphdc in next, bphdc in next* repeat around. Join. (30)

Rnd 16: ch 1, fpsc in first, bpsc in next, *fpsc in next, bpsc in next* repeat around. Join. (30)

FASTEN OFF


Friday, February 27, 2015

Finger crochet cowl pattern with photos

Oh my goodness I am back into the world of technology! I was finally able to get a computer (Since mine broke, that's life right). I have so many patterns to now get caught up on *12 to be honest*.. Yeah it is going to be a little while but Please keep your eye out for my new patterns! Please be sure to keep an eye on my Facebook page Creative Crochet Products for all my updates on patterns, pattern testers and current projects! I will be trying to do more link blasts too, weekends mostly.


Now on to more pressing matters.. this amazing finger crochet! I dont know how many people have tried this finger crochet but it is the same thing as crocheting with a hook, but using your fingers! This is amazing and I will be doing more things soon.
Also please remember you are crocheting the same way as you would with a hook. The only difference is your hook is on your hand!
**PLEASE NOTE: THERE IS A LINK TO FIBER FLUX VIDEO TUTORIAL, SHE IS A GREAT DESIGNER! I WILL HAVE MANY PHOTOS AND AS MUCH DIRECTIONS AS I CAN**
Fiber Flux Blog & Video of 'How to Finger Crochet' (click me!)


Free Finger Crochet Cowl 
By Creative Crochet Products

Materials:
Super chunky yarn 2 balls (I Used lion brand super chunky yarn)
yarn needle 
YOUR FINGERS!

Stitches used:
Ch: chain
Sc: Single Crochet
Hdc: half double crochet

Special notes: MUST READ!!
ALWAYS work your first st in same sp as join unless specified otherwise
Join: Always join to first st made unless specified otherwise 


 Start your ch (you can use any finger that
you feel most comfortable with, I used my first
and middle finger) 


 Row 1: ch 26, (careful not to twist the chain) Join to first ch made.


Row 2: ch 1, sc in each sp across (please refer to Special notes at the beginning of the pattern). Join. (26)


Row 3-17. ch 1, hdc in each sp across. Join. (26)

Row 18. ch 1, sc in each sp across. Join. Fasten off.

Here is my youngest son modeling this cowl hahaha. He said it was supper soft and he didnt want to take it off :) One of my biggest supporters right here!